

Portlets are pluggable user interface software components that are managed and displayed in a web portal. They produce fragments of markup code that are aggregated into a portal. There are two specifications of portlets that exist nowadays: JSR-168 (Java Portlet Api) and JSR-286 (Java Portlet Api 2.0).
Liferay is an open-source portal bundled with different servlet containers, such as Tomcat, Jetty, Geronimo, JBoss, etc. As it is open source, it has a wide variety of open source portlets for every life situation. To deploy your own, you need the Liferay portal installed. I used Liferay bundled with Tomcat version 6.1.0 and Grails 2.0.4.
Documentation for Liferay Portal can be found at https://www.liferay.com. However, the provided docs are not very good in my opinion.
Let’s create our own portlet for the Liferay portal. You can create more than one portlet within your Grails application, which is very good, and actually, it’s very easy to implement portlets in a Groovy way, so let’s keep going!
We need two great plugins installed, called portlets and portlets-liferay:
grails install-plugin portlets
grails install-plugin portlets-liferayDocumentation for these plugins is also available at the Grails site, to which you can refer at any time and place.
To create a portlet application, we need to generate a portlet class that will contain specific Liferay configurations and portlet actions needed for the portlet to work. This can be done by executing a Grails command:
grails create-portlet <package>.<portlet_name>* Note that this command will automatically add ‘Portlet’ keyword to the end of ‘\<portlet_name>’.
You’ve just created a portlet class, great.
Portlet.groovy file will be generated in /grails-app/portlets directory.
Here is what it would look like:
import javax.portlet.*
class <portlet_name>Portlet {

 def title = 'Portlet Title'
 def description = '''
Description about the portlet goes here.
'''
 def displayName = 'Display Name'
 def supports = ['text/html':['view', 'edit', 'help']]

 // DEFINITIONS FOR liferay-display.xml
 def liferay_display_category = 'MyCategory'

 // DEFINITIONS FOR liferay-portlets.xml
 def liferay_portlet_ajaxable = 'true'
 def liferay_portlet_header_portlet_css = [
         '/css/protoFlow.css'
 ]
 def liferay_portlet_header_portlet_javascript = [
         '/plugins/richui-0.5/js/flow/lib/prototype.js',
         '/plugins/richui-0.5/js/flow/lib/scriptaculous.js',
         '/plugins/richui-0.5/js/reflection/reflection.js',
         '/plugins/richui-0.5/js/flow/protoFlow.js'
 ]

...Portlets-liferay plugin for Grails reads configuration from Config.groovy and Portlet.groovy files and then generates all needed Liferay xmls and property files in grails-app/web-app/WEB-INF directory.
In your portlet class, you can define the title of the portlet, the display name, the description of the portlet, the header JavaScript and CSS files references, etc.
In Config.groovy file, you can specify role-mapper and custom user attributes, as I did:
liferay {
   portlet_role_mappers = ['administrator':'Administrator', 'guest':'Guest']
   //portlet_custom_user_attributes = ['foo':'com.example.bar.Baz']
   plugin_package {
       name = "${appName}"
       module_group_id = 'MyModule'
       module_incremental_version = '1'
       tags='sample'
       short_description='Hey, this is a car portlet, dude!'
       change_log=''
       page_uri=''
       author='Aleksey Lisikh'
       license='Proprietary'
   }
}Available Liferay roles can be found at “Control panel → Roles”.
Freshly generated portlet class has some demonstrating closures that render demo views, but we don’t have any views yet. Ok, let’s generate some of them:
grails generate-portlet-views <package>.<portlet_name>Aha, here they are, thank you Grails! “view.gsp, edit.gsp, help.gsp” would be created in directory /grails-app/views/.
After these steps, your portlet can be deployed to the portal. Hmm, but it’s not just what we wanted, as it does nothing at the moment, so let’s add some stuff to our portlet.
I would like to create a domain class with the name Car:
grails create-domain com.sysgears.CarNow simply add two string fields to this class: ‘name’ and ‘color’:
class Car {

   String name
   String color
}Bootstrap class can be used to fill the database with values as usual:
class BootStrap {

   def init = { servletContext ->
      if (!Car.count) {
         def cars = [['BMW', 'Black'], ['Mercedes', 'White'], ['Porshe', 'Yellow'], ['Aston Martin', 'White'], ['Daewoo', 'Gray']]
         cars.each { car ->
            new Car(name: car[0], color: car[1]).save(flush:true)
         }
      }
   }

   def destroy = {
   }
}Generated portlet class has renderView and actionView actions, as you can see, the second part of the action’s name is ‘VIEW’, which means that these actions refer to the ‘VIEW’ portlet’s mode. Also, there are ‘EDIT’ and ‘HELP’ portlet modes available. More information about portlet actions available at liferay community site, please refer to it if you got some questions (and may also Google be with you).
renderView – renders view.gsp.
renderAction – makes some stuff for the VIEW mode. Let’s change these two actions so that the portlet would be able to delete car instances from the database:
class CarPortlet {

   def title = 'Car Portlet'
   def description = '''
   This is my sample grails liferay portlet.
   '''
   def displayName = 'Car Portlet'
   def supports = ['text/html':['view', 'edit', 'help']]
   def liferay_display_category = "Cars"
   def liferay_portlet_header_portlet_css = [
     '/css/car.css'
   ]
   ...

   def actionView = {
      //TODO Define action phase for 'view' portlets mode
      def car = Car.get(params.id)
      if (car) {
         car.delete()
      }
   }

   def renderView = {
      //Return the map of the variables bound to the view,
      //in this case view.gsp if it exists or render.gsp if not
      def cars = Car.list()
      [cars: cars]
   }
   ...
}
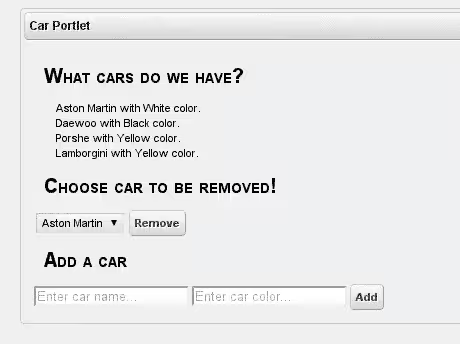
We also need to change the ‘view.gsp’ file to meet our desires.
<%@ taglib uri="https://java.sun.com/portlet" prefix="portlet" %>

<div>
  <h1 class="header">What cars do we have?</h1>
    <ul>
      <g:each in="${cars}" var="car">
        <li>${car.name} with ${car.color} color.</li>
      </g:each>
    </ul>
  <h1 class="header">Choose car to be removed!</h1>
  <form method="post" action="${portletResponse.createActionURL()}">
    <g:select name="id" from="${cars}" optionKey="id" optionValue="name"/>
    <input type="submit" value="Submit"/>
  </form>
</div>But what should you do if you wish to add your own action? Hmm… that is the question! Let’s define an action for creating cars. In our portlet class, it will look like this:
...

def addCar = {
   log.info('In add action. ' + params)
   if (params.name && params.color) {
     carService.saveCar(params.name, params.color)
   }
   portletResponse.setPortletMode(PortletMode.VIEW)
 }

...By the time I wrote this article, GORM didn’t work in portlet actions, and this is a known bug. The simplest way to solve this problem is to create a service class that would do GORM work. Yeah, here it is:
class CarService {

  def saveCar(String name, String color) {
     new Car(name: name, color: color).save(flush: true)
  }
}OK, we solved our GORM trouble. Now, let’s create a view for adding cars.
We need to get link to action from view, so let’s change view.gsp, it’s pretty simple:
<portlet:actionURL var="addCarURL">
 <portlet:param name="action" value="addCar" />
</portlet:actionURL>

<h1 class="header">Add a car</h1>
<form method="post" action="<%= addCarURL %>">
   <input placeholder="Enter car name..." name="name" />
   <input placeholder="Enter car color..." name="color">
   <input type="submit" value="Add" />
</form>” tag creates the portlet’s actionURL, we need to specify a parameter which would be the name of the portlet’s action. I created an action ‘addCar’, so I need to specify a parameter for actionURL with the value of ‘addCar’. After doing this, you will be able to add cars to the database.
We can invoke our newly created portlet action, but now another question is: ‘How can we render our own views?’ Well, it is not much different from mapping to a portlet action; you simply have to define a portlet tag in GSP.
When a car is added, I want my application to show a message that the car was added. For that case, I created ‘added.gsp’ in /views/car/ directory, which looks like that:
%{--added.gsp--}%
<%@ taglib uri="https://java.sun.com/portlet" prefix="portlet" %>

Car was successfully added!

<portlet:actionURL var="view" portletMode="view" />

<a href="<%= view %>">Back</a>I wish this page to be rendered after the car was added, so I need to change our ‘addCar’ closure a little:
...

def addCar = {
    log.info('In add action. ' + params)
    if (params.name && params.color) {
       carService.saveCar(params.name, params.color)
    }
    portletResponse.setRenderParameter("action", "added");
}

...‘portletResponse.setRendererParameter’ will invoke the portlet’s closure named ‘renderAdded’, which I left empty, as it’s not necessary to get any model for that view:
   def renderAdded = {
       log.info('Rendering added car view.')
}Also, if you wish to render a custom gsp view file, you can do it by creating a link to an action that renders gsp page:
<%@ taglib uri="https://java.sun.com/portlet" prefix="portlet" %>

<portlet:renderURL var="added">
 <portlet:param name="action" value="added"/>
</portlet:renderURL>

<a href="<%= added %>">Go to page</a>By clicking on “Go to page”, renderAdded will be invoked, and that action renders ‘added.gsp’. Just what we needed! 🙂
And this is it! Now let’s see what we’ve got:
- Create a war file, using the Grails command:
grails war - Then just copy the freshly created war file to %LIFERAY_HOME%/deploy directory. Liferay will deploy your portlet application, and it will be available for use.
- Add a portlet to the page. Log in as Bruno admin (or another credentials with admin rights), then in the control panel, go to Add → More → (in our case, it’s named ‘Cars’) and simply drag and drop it (which is ‘Car Portlet’ for me) to the page.
Here’s a screenshot:
Hope this will be helpful. Cheers!


