




If your team uses AI agents for frontend tasks, this scenario may be familiar: the designer creates a page in Figma and the developer takes a few screenshots to feed them to an AI coding agent. The result, however, is often only close enough to the intended design, and the differences are hard to miss.
AI coding agents can generate a UI from screenshots in minutes, but getting it to match the original Figma design often takes additional rounds of corrections. The problem is neither the model itself nor the prompt but the limited design data the agent receives.
Figma MCP gives agents access to structured design data, while Playwright MCP lets them verify the result in a browser. But how much difference do these tools actually make?
To find out, I built the same page twice – using Figma MCP and Playwright MCP – and compared the results in terms of design accuracy, time, cost, and amount of generated code.
Key Takeaways:
- In a two-run experiment, combining Figma MCP and Playwright MCP reduced pixel difference from 19.10% to 0.26%, model working time from 13 minutes 24 seconds to 6 minutes 6 seconds, and cost from $3.89 to $2.58.
- Figma MCP gives agents access to structured design data, exact values, and reusable assets. Playwright MCP provides a consistent way to verify the resulting UI in a browser.
- A well-organized Figma file is essential: variables, reusable components, auto layout, and meaningful layer names help agents generate code aligned with the design system.
- Documenting the implementation and verification workflow in CLAUDE.md helps agents follow consistent steps across design tasks.
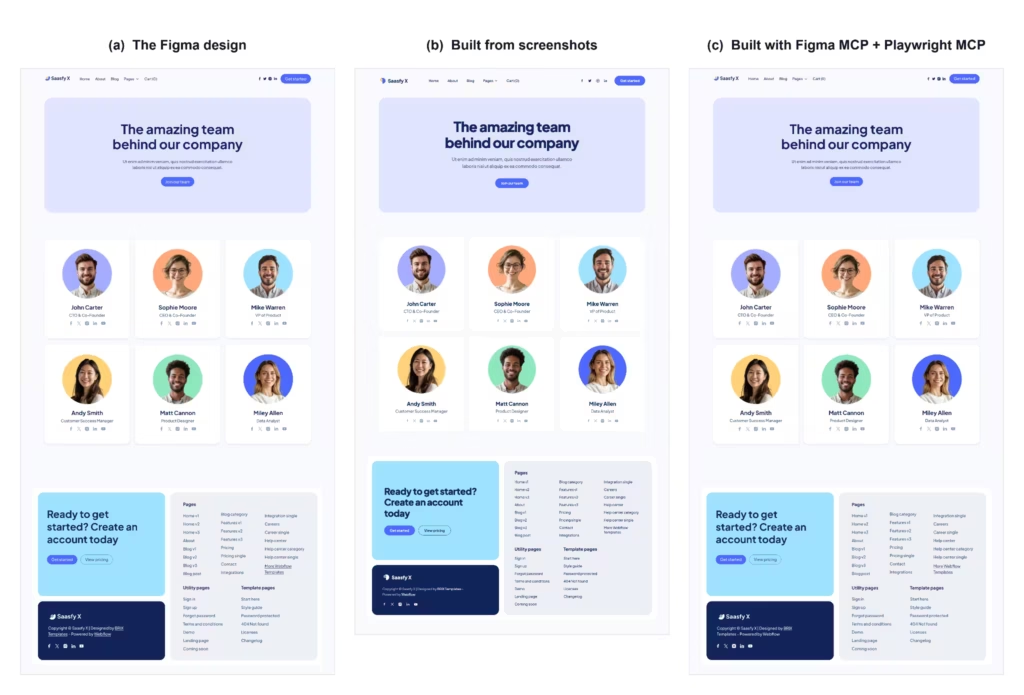
Here’s what it looks like. A team page from a Figma template is on the left; the other two are the AI-built versions of it. At a glance, all three seem identical, but if you look closer, only one of the builds actually matches the design.
Why AI Agents Miss the Design
A design in Figma is a set of decisions: exact values, reusable components, rules for how elements behave. Screenshots, however many you take, are only snapshots of the result, so the agent has to work the decisions back out from pixels, and that means guessing.
What a Screenshot Hides
Exact values. The agent sees only pixels, not exact values. It cannot know the scale of the screenshot, and since image compression distorts colors, every size and hex value the agent produces is an estimate that might or might not match the design.
The design system. A screenshot doesn’t show which colors are design tokens, which text styles are shared, which elements are instances of the same component, or which variant of a button is used. So the agent invents its own names and structure, and as a result the code doesn’t line up with the rest of the product.
Anything not drawn. Unless a developer captures every state and breakpoint, the agent never sees hover, focus or error states, or how the page should look at other screen widths. And unless icons and illustrations come as separate files, the agent has to crop, redraw, or replace them with lookalikes, which also costs extra tokens.
The full page. A long page doesn’t fit in one readable screenshot, so it’s usually split into several. The agent has to work out how the pieces connect, which is the place where alignment and spacing tend to go wrong.
A reliable check. Agents usually try to verify their work, but with screenshots the only reference is the same imprecise image the page was built from, so the check repeats the original guesses.
What Figma MCP Changes
Figma’s official MCP server lets the agent open a link to a frame and read the design directly instead of looking at a picture of it.
The agent gets a structured description of the selected frame, with its layout, sizes and text styles. It also gets the variables used in it, so colors, spacing and typography arrive as named tokens with exact values. Images and icons come as real assets the agent can download and use directly. The agent can explore a large page as a map of its parts and fetch it section by section, instead of stitching it from screenshots. And it can still request a rendered image of the whole frame when it needs a visual reference.
In short, the agent stops guessing and starts reading. How clean and complete the resulting code is then depends on how the Figma file is built, which I cover in the setup section below.
What Playwright MCP Adds
Playwright MCP gives the agent access to a real browser it can control. It can open the page it has just built, take a screenshot, compare it with the design, and fix what’s off before a developer ever looks at it. Additionally, it can click, type, hover, focus and resize the window, which is how you check the things a static screenshot can’t show: interactive states, forms and responsive layouts.
The two tools solve different parts of the problem. Figma MCP makes sure the agent starts from the right values. Playwright MCP makes sure it can verify the result in a standard, predictable way.
| Problem | Tool |
| Matching the design: values, tokens, components, assets | Figma MCP |
| Checking the result, including states and screen widths | Playwright MCP |
What This Looks Like in Practice
How I Tested
To see what these tools change in practice, I asked Claude Code to build the same page twice: once from screenshots, once with Figma MCP and Playwright MCP connected. I picked a typical marketing page from the Saasfy X Figma template by BRIX Templates: a header, a hero block, a grid of team cards, and a footer, which is the kind of page frontend teams build every week.
In the screenshot run, the agent got screenshots of the design, top to bottom, and the images as separate files. In the second run, it got a link to the Figma frame instead. Everything else stayed the same: a clean project, a fresh session, the same model (Claude Sonnet 5), and the same prompt. The prompt asked the agent to match the design as closely as possible and to verify the result before finishing, without saying how to do it. And I gave it no hints along the way.
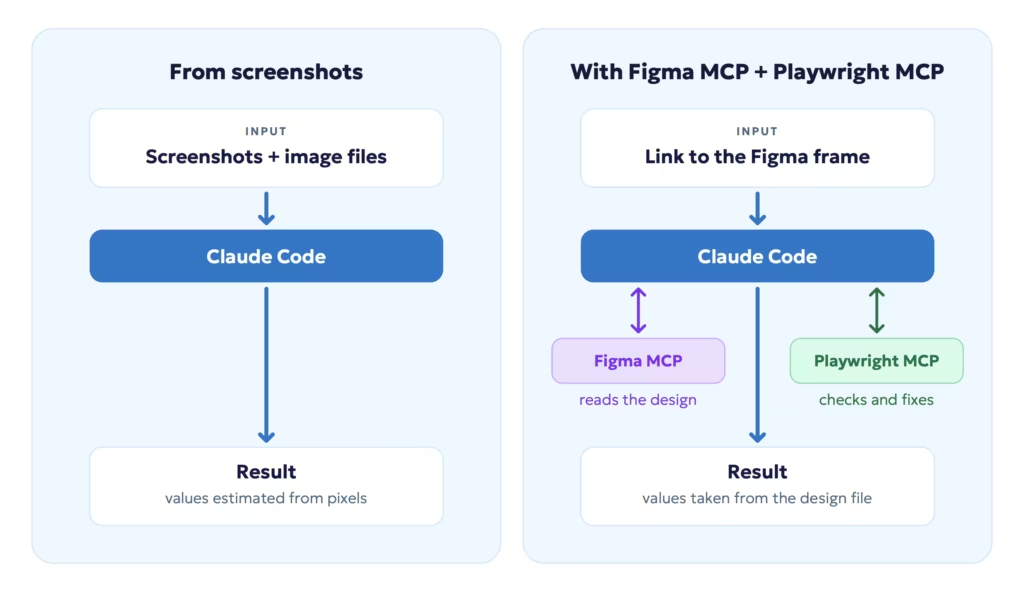
Then I compared how closely each result matched the design, how much it cost, how long it took and what the code looked like.
How I Measured
Design match. I wrote a script that opened each finished page in Chrome at the design’s width of 1440px, took a full-page screenshot and compared it with an exported image of the Figma frame. For the comparison, I used pixelmatch, a library that checks two images pixel by pixel and counts how many pixels differ. The score is the percentage of pixels that don’t match. The script also saved a diff image that shows where the differences are: red marks pixels that differ, and yellow marks anti-aliasing differences (the smoothed edges of text and shapes), which don’t count toward the score. Note that this method is strict about shifts: if one section is a few pixels too short, everything below it counts as different.
Cost and time. Both came from Claude Code’s session stats. The time is how long the model spent working, not counting pauses for permission approvals.
Fairness. The scripts and reference images were kept in a separate project the agent couldn’t access, so it couldn’t check its work against the scoring setup.
Results
| Criteria | Screenshots | Figma MCP + Playwright MCP |
| Pixel difference from the design | 19.10% | 0.26% |
| Cost | $3.89 | $2.58 |
| Model working time | 13 min 24 s | 6 min 6 s |
Design match. The screenshot version made exactly the mistakes described earlier: spacing between and inside sections was smaller than designed, typography had the wrong sizes and weights, and the icons came out smaller. By contrast, the version built with Figma MCP and Playwright MCP matched the design almost pixel for pixel.
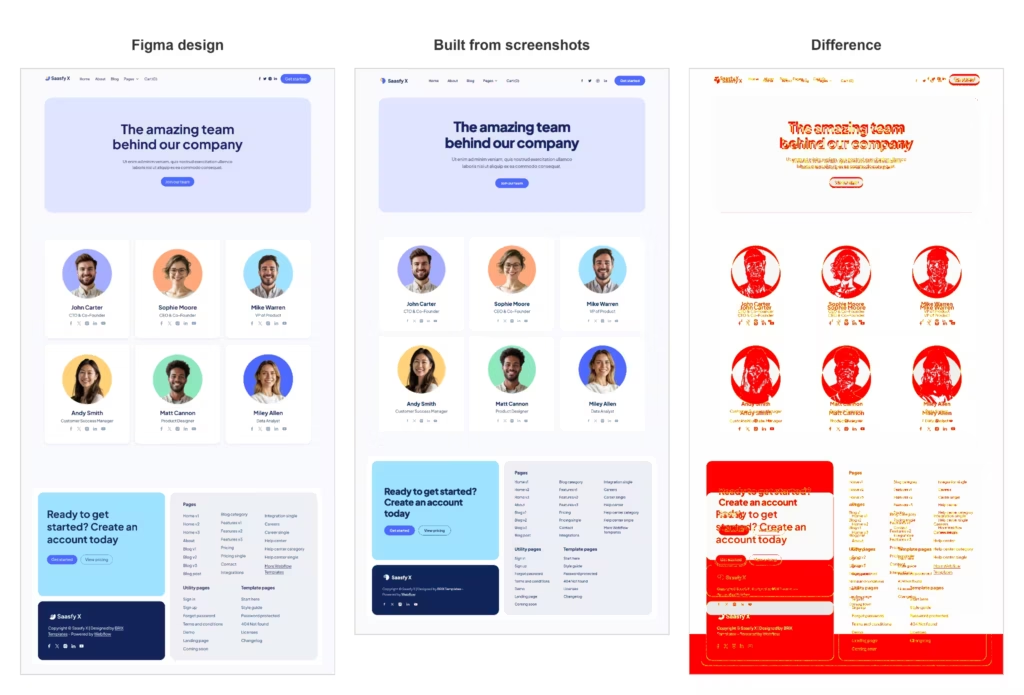
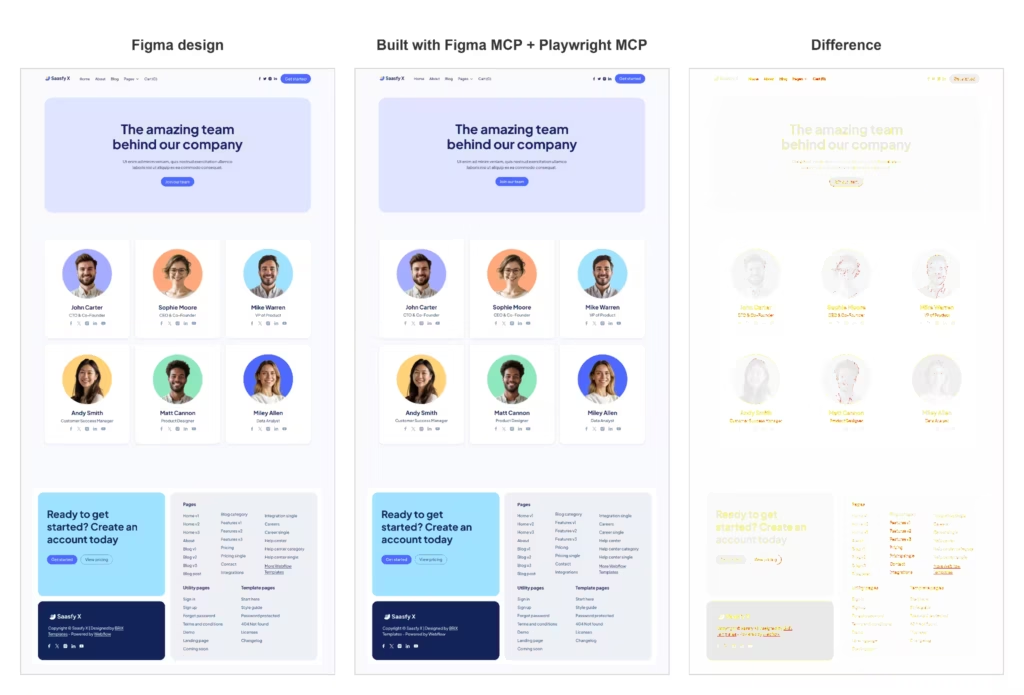
Cost and time. The screenshot approach was not only less accurate but also cost about 50% more and took the model more than twice as long. Estimating every value, checking it and adjusting it again is what slowed the agent’s work. With the real values at hand, the agent simply took them and moved on.
Code. From screenshots, the agent estimated sizes from the pixels and hardcoded colors as raw hex values. With Figma MCP, it used the tokens defined in the design file, so the code stays connected to the design system:
/* Built from screenshots */
.cardName {
  font-size: 24px;
  font-weight: 700;
  color: #102459;
}

/* Built with Figma MCP */
.cardName {
  font-size: 26px;
  font-weight: 700;
  line-height: 1.25;
  color: var(--neutral-800);
}What I Learned
Figma MCP is where the accuracy comes from. Reading real values instead of guessing them made the agent both more precise and more efficient. The design data does take up context, about a third of the session’s usage in my experiment, but the total cost still came out lower than with screenshots.
Playwright MCP is what makes checking reliable. I asked the agent to make sure the result matched the design but didn’t say how. Without a dedicated tool, it found its own ways: it ran headless Chrome from the terminal, installed image libraries and wrote its own comparison scripts, differently each time. That kind of improvised checking is hard to control, hard to repeat, and can cost an unpredictable amount of tokens. With Playwright MCP, the agent used one standard tool, the same way every time, and every step was visible.
How to Set Up Figma MCP and Playwright MCP for UI Development
Connecting the tools takes minutes, but getting consistent results depends on two things: the design file and the setup around the agent.
Prepare the Figma File
The agent’s code can only be as clean as the design file it reads. If colors and text styles are defined as variables, the agent uses them as tokens. But if the layout is built from loosely positioned layers, the agent copies raw coordinates instead. Figma’s own recommendations for MCP point the same way:
- Use variables for colors, spacing, radius and typography, so the agent gets tokens instead of raw numbers.
- Use components for anything that repeats: buttons, cards, inputs.
- Use auto layout to show how elements should stretch, wrap and align.
- Name layers meaningfully, like TeamCard rather than Group 5.
- Design the states and breakpoints you expect to see in code, or describe them in annotations.
While a well-structured file used to be just a matter of design hygiene, with AI agents in the loop, it now directly affects the quality of the code.
Set Up the Agent
- Install the official Figma plugin for Claude Code. This is Figma’s recommended setup. Besides connecting the MCP server, it adds ready-made skills for working with designs, so you don’t have to explain the basics to the agent yourself.
- Use Code Connect if you have a design system. It links Figma components to the matching components in your code. That way, the agent reuses the components you already have instead of writing new markup from scratch.
- Describe the workflow in project rules. Claude Code reads a project instruction file, CLAUDE.md, at the start of every session. A few lines there are enough to make the agent follow the same workflow on every design task. For example:
## Implementing designs from Figma

When implementing a design from a Figma link, follow these steps:

1. **Get the design:** Fetch the design context and variables for the linked frame through Figma MCP.
2. **Implement:** Build the UI with the project's existing components and design tokens. Don't hardcode colors or sizes.
3. **Verify:** Open the page with Playwright MCP, compare it with the Figma frame and fix layout and styling differences until there are no visible differences left.Conclusion
Getting AI agents to build UIs that accurately match the Figma designs requires giving them access to the right design context and ways to verify their work. My experiment showed that combining Figma MCP and Playwright MCP can substantially improve design accuracy while reducing time and cost. But the tools alone aren’t enough: a well-structured Figma file and a description of consistent workflow are just as important for getting reliable results.
If you want to bring AI agents into your development workflows without trading away design quality, SysGears engineers will help. Contact us to discuss your project, and we’ll find the setup that fits your team and design system.


